

Less than two weeks for the parcel to arrive and great communication from the US supplier Vatican Enterprises http://www.wargamescenics.com/products.html The resin is a nice Amber, light and durable. Little frustrated by the 20% customs duty and £8 fee but even so these are still good value I feel, including all the taxes and postage less than £100 for the lot.
 I usally prime black but being low on black spray I have cheated with white mostly, lets see how that works out.
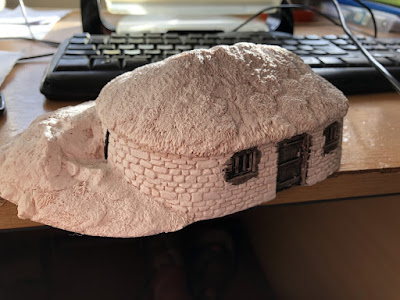


 First I tried blacking out the door and windows, then slopping some watered down dark brown to get a base coat, doesnt need to be too thick but does need to be dark in all the cracks, I didnt bother doing the black first after the first one as I ended up slopping brown all over it anyway, the black can wait till later in the process for the rest.
 The branches, twigs, rushes etc that made the original base of the rooves poke through the models in various places adding some nice character, I want to highlight these so again a slap of brown to kick those areas off.
 The turf areas are going to be mainly shades of green, that might seem obvious but initially I though it would mainly be dead grass, so brown or buff. All the images I have googled though give relatively lush green grass so thats good enough for me. Again a slap of dark green base coat, slightly watered down in-consistantly, this has ended up giving me different shades of green as it floods the white primer, I actually quite like how that has ended up and this first one is starting to show what the end result might give us.


I am starting with brown as I dont want my crofts to have all grey stonework like most I have seen but want a more sandstone look to them. This will match the buildings I already have.
I mainly use Colour Party Paints. Apart from supporting a local small business they are also my favourite paints, great coverage, nice texture and some lovely colours. Them being a 10 minute drive for me is just a really nice bonus. The brown I use is MA10 Negro flesh but any chocolate brown colour would work.


The woodwork on the roof has also recived a strong dry brush with MA36 Eurasian flesh bizarely , this is my prefered colour for any wood, whether thats thatch or spear shafts.
Whenever I am painting something I usually get a moment where I think "This is rubbish its not working" this was my moment, at this stage it really doesn't look very good and its becoming hard to see what the end result will yield. Stick with it.
 Next I wet brush the doors and windows with a mid grey, I used MA30 battleship grey, just leaving traces of black here and there for the deeper cracks.

Then its my first proper dry brush onto the stone work with a buff colour. MA58 tanned flesh I think, it is however an old bottle with faded writing so hard to read and I could be wrong.


 The grass over the rocks on the right is a bit heavy in places so I will stick a wash of rifle green over it to tone it down a bit.
 Lastly the whole lot with the exception of the grass gets a good dry brush using MA33 bleached linen, a really nice pale ivory colour. This brings all the detail in the models out and brightens the whole piece. Amazing what a difference this last step makes.

All that remains is to add a few tufts for colour and texture, I have used some purple flowers as heather and also dropped a couple of tufts on the rooves as I like how scruffy it makes them look. You might also add some details like door knobs etc, you can just see one in the rear building and it makes a difference.
 So to finish some nice shots of the two crofts with some miniatures for comparison, really pleased with these, onto the next two.


Now I want to dry brush the grass, for this I use a yellow colour, in this instance I use Lemon yellow from Miniature paints, just because thats what I have to hand and it works well. However as it is bright you have to be careful not to brush it too heavily or it looks a bit odd.


 |


I am sure this is not to everyones taste, the daker grey granite type stone work adds a dour look which may be in keeping with many peoples perception of the rainy highlands but I prefer this brighter look. I make no preffession that this is how to do it, just my take on it and I am happy with the end result. Hope you like, starting the next two soon and who knows one day I may even get to play with them. Stay safe.
love the stonework
ReplyDeleteMuch appreciate Jerry
DeleteNice work Roger, they look fab!
ReplyDeleteThank you Ray
DeleteThey look great Roj and you make it sound so simple 😎
ReplyDeleteBetween you and me Chris it is, but shh dont tell anyone.
DeleteVery nice, in particular the stonework
ReplyDeleteCheers Neil, appreciate it.
DeleteThese look great to me - not every building north of Aberdeen is built from exactly the same type of stone so no reason every model should look exactly the same! Turf roofs should have some green in them too - they are not the same as thatched roofs further south!
ReplyDeleteThanks very much
DeleteNice work and they look great. I’m a cheap scape so they feel expensive to me but do look lovely models. Interesting to see you painting approach very thorough and the results show it 👍
ReplyDeleteCheers Matt, actually really good value, the postage and customs duties do take their toll though (sUrry couldnt help it) that said still relatively competetive compared to some of the nicer models available in the UK.
DeleteI'm planning to copy you. Thanks.
ReplyDeletePurest form of flattery so thank you, please let us know how you get on.
DeleteThey look really nice Roger...
ReplyDeleteI certainly think that Hudson and Allen are well worth the money...
I wouldn’t mind a couple more myself...
All the best. Aly
Cheers Aly I agree, I think I probably have enough for now but that could change depending on future projects.
DeleteThey look really great, Roger. I like the warmer brown - and a pleasant change from slate grey! I agree that the H&A buildings are great. Really good material and superb details. I can never understand why they don’t have a UK re-seller as I would have thought they would have shifted a good selection of stuff here.
ReplyDeleteThank you sir. I imagine it will take an established UK retailer to approach Ben at Vatican to make UK re-seller a reality at some point.
ReplyDeleteVery nice indeed! Good to see these in the hand of a gamer as I have looked at them in isolation on their website several times
ReplyDelete