Saturday 30 May 2020

Sikh Wars British 31st Huntingdonshire Foot

Image result for 31st foot regiment sikh wars


Another unit brought back by the basing department before lockdown, these guys are the 31st Huntingdonshire Foot. A buff faced unit these are Wargames Foundry from the Sikh Wars range. I also used half a dozen Perry Carlist war figures to flesh this unit out and add some variety. They mix in quite well though you can tell which are which. I love how dynamic this unit is.

This regiment fought in Afghanistan in 1842 as part of Pollocks avenging army and all four major engagements of the first Sikh War, so a perfect unit for both Wars.

At Mudki the 31st were in Sir Harry Smiths First Division in Boltons first Brigade with the 24th and 47th Native Foot. The latter a unit I already have painted and based ready to join the fray with the rest of their Brigade and the 24th is another one I plan to complete, probably the next in line I think to give me two historically complete brigades.

Another unit of these figures to follow at some point, ideally though more Sepoys first.

Thanks for reading.

Tuesday 26 May 2020

A Slightly Dodgy Russian Civil War Armoured Train

For quite a few years I have had this bunch of toy trains in a drawer with a view to having a pop at turning them into an armoured train or two. About 6 years ago I made a start which was so horrible I ripped all the card off the train and dumped them in a drawer.  Cant remember where I got them but have a feeling Mr Charlton was involved.

I decided to have a break from Poles, Cossack's and Sikhs for the bank holiday weekend and try get some Russian Civil War figures completed, scanning through the Lead Adventure forum for some inspiration I came across a fantastic home made armoured train pieced together from similar toy train parts and decided to resurrect the idea.
As will become obvious I am not a gifted modeller, I can do OK with the painting but building models is really not my thing, and scratch building even less so. Still I was willing and as a starting point I already had a flat car made from the chassis of one of the carriages and some balsa wood. I also had a naval gun bought from the Virtual armchair General some years ago.
I decided to give myself a fighting chance, so instead of a an all singing and dancing fancy armoured train my was to be a hastily converted goods train with some boiler plate slapped on and painted battle ship grey. Improvised armoured train being the correct terminology I think. There were  lots of these home made armoured trains cruising the rails of post WW1 Russia so all good. My first task would be to start on a gun carriage and the steel coal car looked favourite for converting.
The significant number of parts for the gun was rather off putting mind you.
Hack saw in hand first job was to chop off a third of the coal car as this is where the gun would go. I had an image of the Gun shield sitting across the front so the whole was quite enclosed. It didn't quite work out though.
With the front chopped off I put a new floor in and a roof where the coal had been.

I then took the carriage and glued on some plastic sheets and drilled holes in the corners and edges to give the impression of bolts. Now ideally these should be raised but my talents don't stretch to making tiny rivets in 28mm so holes would need to do. Checking the gun and it does at least fit on the space created for it.
The Engine then gets the same treatment, MDF though as I have run out of plastic bases, starting to wonder at this point if it was a good idea. Still keeping it simple is helping.
I bang some smaller pieces on as steel covered windows for the carriage and then prime the whole lot up in black. Already it looks slightly less awful and I am inspired to carry on.

Instead of the shield for the gun which looked rubbish I have added skirts to the cab to give protection to the gun crew. It doesn't look quite as bad as I feared.

All four are now ready for painting. As mentioned battle ship grey is my colour of choice in this case, most trains were either green or grey from what I can see.
 A dry brush over the exposed parts of the engine leaves it a dusty black and then dark grey slapped over everything else.
A mid grey dry brush and a further one with light grey and we are looking something like, I slapped some brown on the flat car and then dry brushed it ivory which also looks OK.
A coat of satin varnish leaves it looking suitably metallic and we are almost done.
T o add a slight dash of colour I have added two 20mm Russian flags to the engine, clearly this is a White Guard, counter revolutionary Gangster train. I have two engines left and plan to leave one as un-armoured and the other as an armoured Bolshevik train. The last carriage will also be unarmoured I think. Ideal really would be to have a heavily armoured train and a carriage with machine turrets etc but I find that all a bit daunting to be honest.
And here it is dropped onto some HO/OO train track which kind of fits and a gun and MG on the flat car coverign the rear of the train, sand bags might be a decent addition on this peice.
I only have corner track at the moment so the train is meandering its way forward in the general direction of the front. I actually think it looks OK. I was tempted to slap a political slogan on the engines plate armour to brighten it up and still might, but that's for another day. No doubt something suitably heroic and historically accurate will present itself.
Amusingly the button in the middle of the engine still starts the train with sounds straight out of Ivor the engine, childishly I keep pressing this to annoy the missis as she is cleaning around me on the table. Well that's it train completed by Monday morning and the bank holiday weekend put to good use. I still need to go back to the Russian Civil War Cossack's and White infantry I intended to paint originally though, which lie part painted on my painting desk.
Interestingly as I was digging through a box to find the railway track I came across this old toy Sopwith camel, Its seen better days and is meant to be built using screws which have mainly been lost but I reckon I could do pull this together fairly simply for another Russian Civil War project (The crusader flags were just some other stuff I found in the box, I dont intend Hospitaller Biplanes)
Maybe the plane is one for next bank holiday? I am sure I have a Pilots torso around here somewhere .........

UPDATE! After pickign up a tip from Trev on the Lead Adventure Forum I added rivets using 2mm rhinestones (nail art from ebay less than £2 for 2,000) painstaking but simple and the end result really li.
A dab of PVA dap te rhinestone p with the brush and dab it back on and then once its dry a splash of dark grey then a very light frey dry brush. All told less than 2 hours work to update it. I thought it worth sharing the update.

Monday 18 May 2020

Workbench more Poles and Cossacks for The Deluge and Nail Art

Another busy week of painting mainly Poles and Cossacks and I am starting to near the point where I can form actual units from the painted figures.

I have particularly focused on Cossack Pikemen and Polish Pancerni with a few other bits along the way this time, mainly to try get some units nearer completion.

With advice from chum Paul Robinson I have also experimented in nail art, more on this later.
In terms of finished units I think I am a few figures short of two Cossack infantry units and 2 Pancerni cavalry Banners (Companies) so great progress.
The Cossacks continue to be a motley mix of manufacturers, from left to right below are Perry Retreat from Moscow, Essex with a Perry head, TAG at the rear, Redoubt Enterprises and at the far right another TAG figures. I am a little unsure of the Perry peasant his head looks too Russian to me, I will see how he looks when mixed in with a bunch of other figures on the bases.
This TAG figure is from a Mounted Polish command pack, initially I wasn't sure how I would use him but a change in my thinking for one unit had me re-assess this. I have a unit of Light Cavalry in Blue Grey, one of the few uniformed units. Re-looking at them they fit far better as Dragoons than Light Cavalry to me. So I plan to give them a different flag and re-purpose them meaning I need a dismounted version. The Officer of that unit is a re-purposed Pancerni Officer in chainmail and a really good fit with this chap so I now have the first of my dis-mounted Dragoons, albeit a pretty awful photo.
Not forgetting my other projects I have also got these two chaps done for the Sikh Wars project. The Muslim tribesmen I have a bunch of these now but I will be mixing them with the Plastics once available. The Foundry Sepoy is the first of the next battalion faced white with white trousers making it really bright.
The old Foundry figures still stand up well against more modern figures such as Perry's.
I have completed a bunch pf Pancerni, just 4 more to do and that will give me two units of these colourful riders.
A trumpeter for each unit was first, one TAG and one Foundry the latter is on a Redoubt horse.

This Redoubt horse is the first to share with you having received some nail art. In short there are a number of manufacturers make water slide decals of the type we will all be familiar with but designed for nails, lots of geometric designs as well as flowers etc. Many of these are ideal for my purposes on the saddle blanket, chum Chris Charlton is taking the idea further for the covering on an Elephant Howdah which should look really cool.

Important to get a background on which the particular design you are using will show up. That has worked on some more than others but looks OK on this one.
The next two are my Essex rider on a generic horse, originally I think Ebor, plus a Redoubt rider on a Foundry horse. I think the size of the Foundry horse is really obviousley small here, the original Foundry rider on a larger horse fitted in really well. I doubt I will use another of the Foundry horses for the Pancerni.
The nail art on the Foundry horse is really obvious although its probably not one I would repeat when I do more of them.
The next three are from left to right TAG, Redoubt on TAG horse then another Redoubt this time on original Redoubt horse.nice figures that work really well and all three have nail art decals on the blankets.
The left hoses has come out quite well with the pink contrasting with the blue, the middle horse I realised the designs were fairly pale and thin so needed a really bright cloth to set them off, its worked quite well but helping me understand what works and what doesn't. The last one in Green with different coloured triangles probably works best of them in terms of standing out on the table top. The Pancerni often carried shields so I have added these in for most of the latest lot.
This Cossack I was particularly looking forward to painting and it did not dissapoint. Originally a Gripping Beast Arab light cavalry man for the crusades, by selecting the best head and torso then adding an arm with a pistol I think he makes a great Cossack or Pole.
Its a really nice casting, both horse and rider and I am pleased with the outcome. Three more of these "Arabs" to paint up for the Deluge.
Lastly is this Polish Dragoon. Another of the small but lovely Essex figures, the foot versions are just too small to use with 28mm, however by adding this guy to a 28mm horse he fits in quite well with other ranges.
I will need a whole unit of these both mounted and dis-mounted so work goes on to find appropriate figures (Mounted I am mainly sorted) the horse is Ebor and looks suitable as a Dragoons nag to me.
So as I write I have another couple of Cossacks and Pancerni on the painting table and hopefully not too far away from glueing these to bases in order to pass them to the basing department when we are finally allowed to see each other again.

I hope you like these and are enjoying this little "side project" no doubt I will return to the others in due course as the butterfly decides to move on for a little while, but for now enjoying the colour of these Eastern troops.

Wednesday 13 May 2020

Minor Conversions for the Deluge Poles and Cossacks

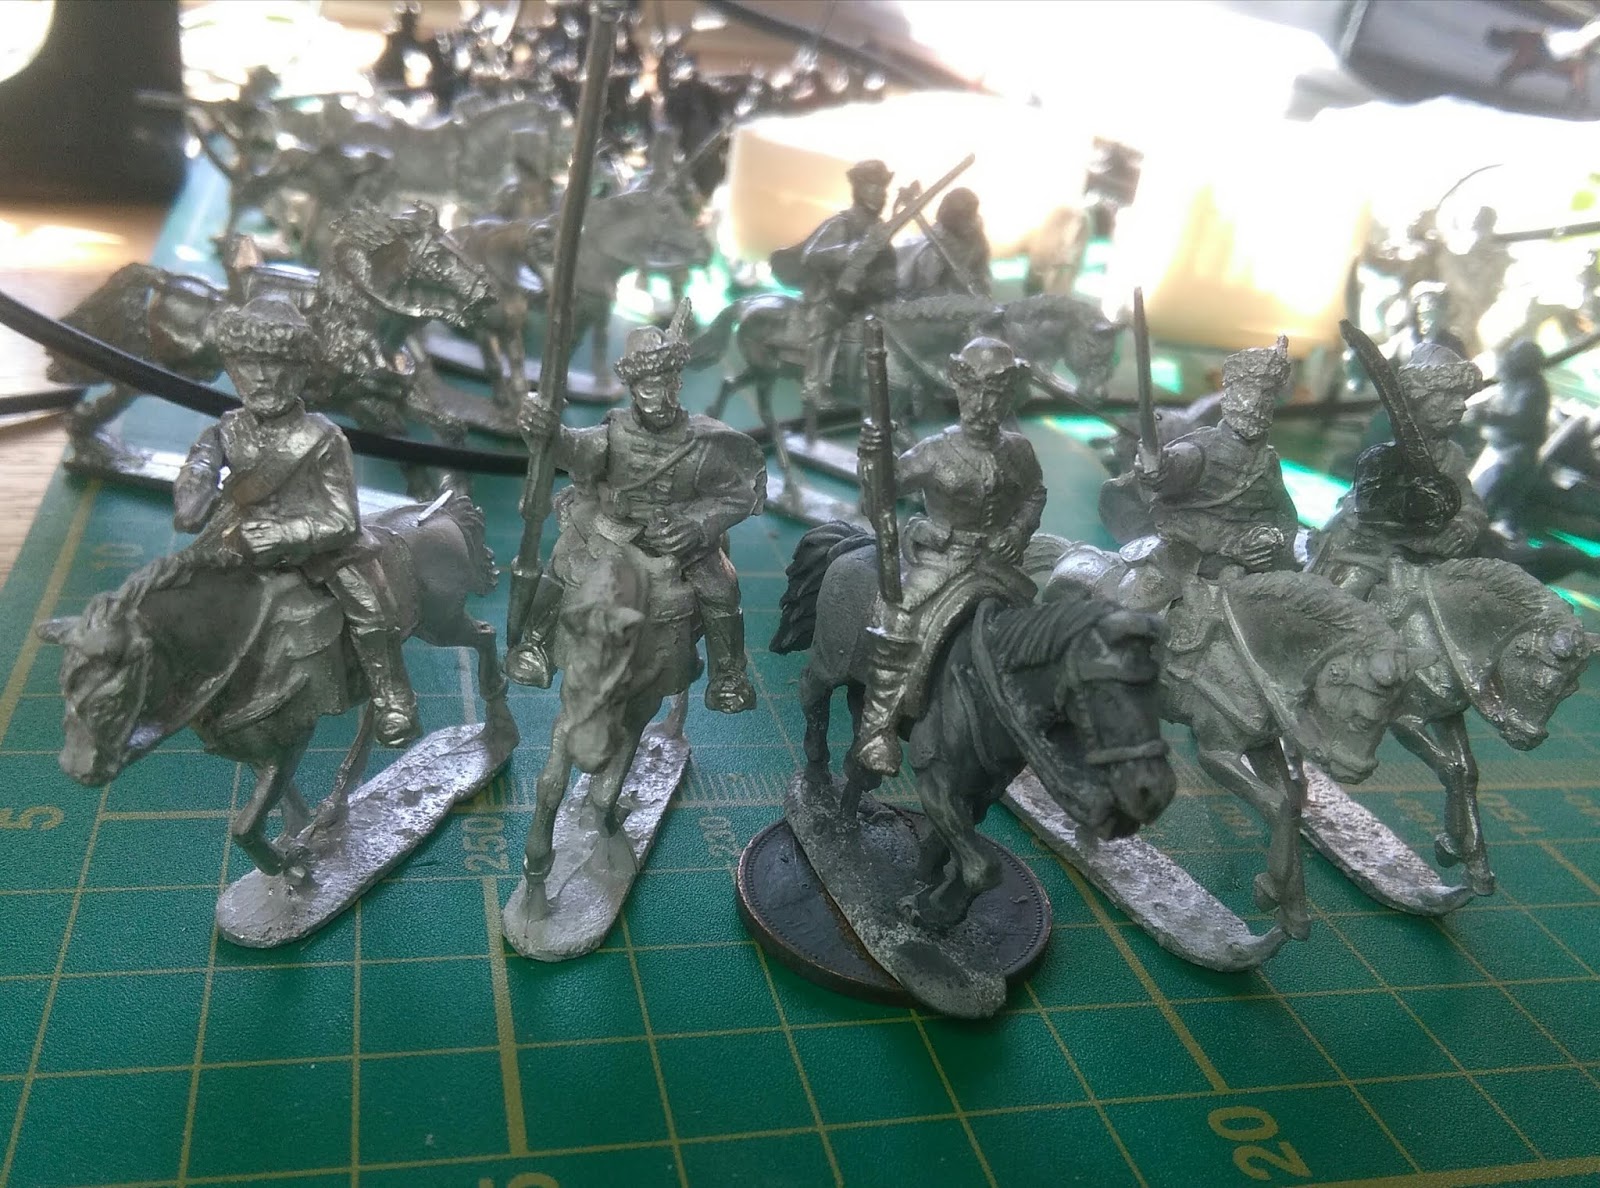
Inspired by some fantastic conversions I have seen on Facebook over recent Weeks I thought I might individualise my forces a bit and also add some variety mainly through the judicial use of interesting plastic figures.

The first step has been using a variety of metal heads on the more obtuse of the metal figures. The below figure is an unknown, the head an Old Glory Cossack, cast onto the other models on its side so the cap is upright but the head itself at a really odd angle I wanted to see if it looked better put on straight, I think it does.
This chap with the bardish axe had a very ugly head, I have cut it away, drilled the neck out and slotted in this very nice Kings Mountain head, this is from a pack with recoon skin hats and the racoon tail has been removed to make it a bit more Eastern European.
This pose does look slightly dodgy to me but the Perry retreat from Moscow head is quite nice so may rescue it when we come to painting.
I also picked up a sprue of Frostgrave figures, I saw the bodies and thought the baggy trousers and loose shirts were ideal for Cossacks, now the weapons are generally oversized but agin may look OK once painted and mixed with other figures, this is the same Retreat from Moscow head as above.
Another Kings Mountain head pressed into service here, the rest of the figure is all Frostgrave.
This chap I will make my mind up about when he is finished, a lovely figure, I have used a Warlord Landsnecht head with a steel helm and a double handed axe which is near enough Bardish to possibly work. the neck scarf looks out but again will decide when its painted if I keep it or sell it on.
This chap has the body of a Gripping Beast muslim foot soldier with the head and flagpole arm from the Fireforge mongol light cavalry plastic sprue. The bald head will need a scalp lock to make it a bit more Cossack.
I love this guys head, the arms are from the Gripping beast muslim light cavalry sprue but the rest is Frostgrave, again the neck scarf I am less sure about and he will need a scalplock adding.
This chap has a Warlord games musket and arms added from the ECW sprues, with the addition of a scalplock he should look just fine.

And here is the same figure with a bit of green stuff to add a scalplock as I had it out to do some work on the Kings Mountain heads. The others with bald heads also now have a little scalp lock too.
To try and tie these to Eastern Europe a little more I have added some green stuff cloth bags to some of the figures and trimmed away some of the coon skin tails. Moustaches are far too fiddle but I gave one a go, see what it looks like once painted.

Polish Dragoons are one of the units I am keen to work on, I decided a mix of thirty years war or ECW dragoons in boots with Warlords Croat light cavalry would do the trick. My Dragoons from Horcata Miniatures in the Czech republic are on their way but the Warlord Croats are here, they come with seperate heads so I have used some of them coupled with Kings mountain heads.
This first dragoon has a Kings Mountain head and Warfare miniatures pistol holding arm, I like this one quite a lot.
This next one has a clean shaven Kings Mountain head and an ECW rested sword arm.
The commander and standard bearer sport original Warlord Croat heads and arms, I didnt want to use too may in this braided jacket as the foot figures will all be in plain jackets. My Officer for the dismounted unit may sport a Western Eureopean floppy hat and so this mounted version may still get swapped.
Lastly for the Dragoons this Essex Polish Dragoon mounted on an Ebor horse fits in really well with the other figures and is actually exactly what its supposed to be.
These last two Craots will form part of my Polish light cavalry unit, probably used as Noble Levy, the left hand figure has a removed Essex Polish Dragoon head and the one on the right a bare headed Redoubt ECW head.
These next three I particularly enjoyed, they are made from Gripping Beast muslim light cavalry for the crusades.
The sprue has three horses, three bottom halves with long coat tails and boots and a choice of 6 torsoes, three have braided chests and three have crossed over coats, the braided ones are ideal for Poles in particular. This figure I twisted slightly to one side and gave him a Warlord Croats arm with hammer and head. Really like this, he looks like he is tring to do someone a serious mischief.

This next figure is all Gripping Beast with the exception of the Essex Polish head glued on and an empty metal scabbard I pressed into service.


Lastly again all Gripping Beast, the bald head with scalplock is perfect for Cossack troops and the addition of a Warlord Croat arm with Pistol brings him into the 17th century. The gap at the shoulder will need some green stuff to tidy it up.
This is definately my favourite of all the figures, leaning back he really looks like he is taking careful aim at some unlucky person.
A bit of greenstuff and he looks just fine. I have yet to decide if I keep the same horses for them, they are lovely but may suit my Sikh Wars cavalry better. I will decide after they are painted I think.
Had a lot of fun with these today and may even pick up some more of the Gripping Beast cavalry, but for now I am keen to see what they look like when they are painted.