The Wagons are easy to assmble and look very solid once complete although I did have some fun with the axles and wheels. If these come out well I may get a Tabor of 6 or 8 wagons.
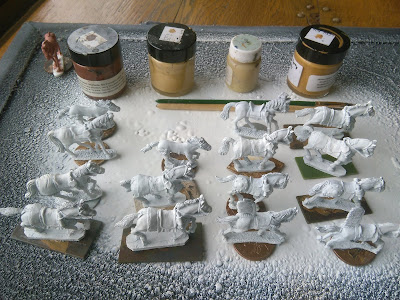
For the horse I paint using Oils, I have described the process before so wont go into too much detail but essentially I prime white and glue to a card or similar base for ease of handling.
I put a light base coat onto this, usually putting a mix of different coloured horses into a unit for some nice variety.
The second hand Foundry Winged Hussar horses are going to get this treatment but to be honest the base colour is already too dark so they may end up just being black horses.
This then gets a coat of darker oils which gets slapped on and wiped off usually with t shirt material (actual T shirts or old underwear, cleaned first of course!) leaving the darker colours in the various creases and crevices to give us some muscle defination.
Its a fairly messy process but it requires no skill at all other than getting the colour mix right for the best final outcome.
The figures below show what this looks like afterwards.
I am happy with the results on the other other horses but less so with the wnged hussars as expected.
It takes a couple of days to dry then we can paint the horse furniture and add the rider. In this case, main, tail and hocks are painted black then dry brushed dark grey. Base colour on the saddle cloth then its detail and shading.
Here is the finished article ready for riders to be painted and added. I added soem really simply designs on two of them to add soem detail.
The finished article with Rider, in this case a Pacerni Offcier with his hand drilled out to accomodate a flag.
I have added to the Cossacks with some Perry retreat from Moscow Peasants. These first two have had minor amends, the left hand figure a hole drilled in his left hand to take a banner, the one on the right had a club removed and a hole drilled through both hands for the same purpose, I think these will look great and I am choosing not to let the fact they have mittens on bother me.
The next three peasants had farming implements which I have cut away and drilled out their hands to take pikes. Cossack foot were a mixture of Pike and shot with the Pikes I believe being half pikes hence these being slightly short. Again I think these fit really well, especially as during the Cossack uprisings many Russian peasants flocked to the Cossack banner to escape serfdom.
I have dropped two of those pike into the below shot with other makes, from left to right Old Glory (bucket and spade replaced by pike) The Assault Group, Essex with Perry retreat from Moscow head swap, Redoubt Zaporozian and then the Perry Peasants. I think they mix quite well.
So once I have finished with the cleaning up, head swaps, drilling, pinning, glueing etc I prime black using a Halfords spray Matt Black which gives a great finish and is much cheaper than many hobby sprays. Like the horse I then glue to a temporary card or similar stand for handling during painting.
Once I have touched up the primer my frst job will always be to dry brush grey anything that needs to remain as black, in this case just his fur hat, I then block paint my base colours, for these two guys that means mainly brown with a bit of Green as thats my theme for this unit, they wont be uniformed but will have a limited colour pallette to join them together.
A bit more green in this one, this is one of the Old Glory figures with a rather odd head, lets see how it comes out as we go along.
After base coats I paint the basic colour I want to come through, in this case on the cloak its a grey green colour,
I have used the same colour for this guys tunic and also dry bushed the fur hat. Both of these greens will need a furthe highlight I think.This cloak has had the lighter main colour added and then some much paler highlights too, it looks quite scruffy which works for me in this case.
Next I will add the basic flesh colour leaving a little of the darker flesh in the creases around the nose etc and a bottom lip.
Lastly I use the light flesh highlight to define the nose, cheekbones, chin and ears. I generally find that works for me. I have added a little bit of white where these guys teeth seem to be showing.A bit more highlight on the green brings this out more.
Fiaally its the detail on the sash, again two layers of colour and the musket and metal work to finish things off.
I am reasonably happy with the end result but these Old Glory chaps are likely to be mixed in with nicer sculpts, particularly in the back row of the units.
We again see here with these painted figures the diversity of the Old Glory figures, some of which are really nice and others not as much so, I personally really like the first figure from the left with the sabre at a rakish angle over his shoulder. The figures second from right and left on the front row are both Foundry.
Well hope that rambling fills a small gap in your Lockdown itinery, more to follow so see you soon.


