We have been playtesting Bloody Backs for the AWI but Steve had also been looking at a couple of other sets and now seems a good time, whilst Bloodybacks is fresh in our minds, to try a couple of others and compare. We will return to Bloodybacks however.
Live Free or Die are simpler in many ways, movements and formations for instance are the same for each unit type, Morale is the main differentiator.
Both sides had decent sized forces with a mix of troops qualities, as you would expect the British regulars were amongst the better troops on table. Chris C commanded the Crown Forces defending a small farm whilst Steve and I divided the American forces advancing upon the dastardly Tories.
The rules are a development from the old Loose files and American Scramble, the basic component is the stand or base with units taking morale tests after loosing a base and firing being 1 dice per base. For most things you require the roll of a 5 or 6 on D6 so fairly simple. Infantry move is 12 inches, skirmishers 24 inches.
Both sides deployed and quickly start to get forward with the America line steadily advancing and the Crown forces moving to take advantage of what cover they can.
The Jaegers deploy on the edge of the woods in order to take pot shots at the advancing continentals. We found the skirmishers very ineffective and came to the conclusion we had just used them incorrectly and reduced their volume of fire by too much.
Supporting the Jaegers Chris pushes a unit of Tory militia through the wood on his left flank.
On the American left flank I push my rifles forward, they move at double the speed of the regulars but as with the Jaegers we found these chaps pretty in-effective. Mainly I think this was how we interpreted the rules. You fire by base but as our skirmishers are in 2's we used 2 bases as one firing dice, a group of 12 figures then gets 3 firing dice, but as they looked pretty big both sides just got one group each which did very little at all. I personally think we should try using a base as a base and have more numerous but smaller units. One to try next time.
On the left the Americans have advanced to within range of the British who have marched out to form a line on their flank with the combined grenadier and light infantry battalions. In the centre the Militia are still catching up/ On the right Steve is contesting the wood with the Militia whilst he manouvres his guns into position in the centre.
In the trading of volleys both sides loose a base forcing a morale check. Each quality has a different number of dice needing just to throw a 5 or 6 once. So British regulars get 4 dice whilst Militia might only get one making it much harder to pass morale tests. In this case my New Jersey regiment have 3 dice and we fall to roll a 5 or 6 and are pushed back 12 inches.
Next round and my second New Jersey Regiment force the British Grenadiers back whilst the British gun inflicts enough casualties to push back my troops. The Militia meanwhile have advanced up to the fence line supported by Steve's continentals.
On the right Steve has seen off both the Jaegers and then the Tory militia, he is however reluctant to send his slightly brittle continentals through the woods into the waiting volleys of 2 very large first class British battalions.
At this point the Militia are hit by a volley and we see one of the interesting aspects of the rules, not that I was happy about it at the time.
The volley took the DMZ 's over 5 (disruption markers) and so removed a base causing a morale check, I needed a 5 or 6 with only one dice and didnt make it so had to retire one move. The militia passed through another militia unit so both units take a further DMZ. Any unit of equal or lesser rating within 6 inches also needed to take 3 more DMz's so meaning the Militia unit behind it had now taken 4 extra DMZ's on top of the one it already had, so they lose a base and force a a morale test which it failed. So the second one was forced to retire and in doing so passed back through the first one adding another DMZ and three more for being within 6 inches of the morale failure, this again removed a base causing a morale check which it again failed and pushed back through the second one again adding 4 more DMZ's. Fortunately for me thats where it stopped but the brigade was a bit of a mess. This is what the rules refer to as a chain reaction and is deliberate with Militia in particular being prone to running away and taking the rest of the militia with them.
On refection its pretty realistic but was a nasty surprise at the time.
Throwing caution to the wind I advance my rifles onto the flank of the British gun, again they are pretty useless and the Grenadiers advance back into the fray and make short work of them with a devastating short range volley.
I have now re-ordered both my Jersey battalions and advanced back into the fray. Steve on the left is loitering on the far edge of the woods pinning the British regulars without getting shot up whilst his artillery is peppering the rest of the British line.
Chris decides now is the time to advance with his Hessians, the American guns however force him back with short range fire.
Chris's Welsh Fusiliers take a pounding and need a morale test, he made me take this photo of the 3 sixes he threw to pass his morale. Pfft!
The British line battalion behind the fence takes a good volley from Steves Continentals supported by the guns, a base goes and Chris is unable to stop them retreating, the Fusiliers meanwhile advance onto the centre of the American line and the reformed Hessians and Militia are pushed across to support the crumbling British right flank.
The Fusiliers get forward but are stopped by concentrated American fire.
The Jersey boys have seen off the light battalion and the Grenadier battalion and line the flank of the British, they think its all over, but two well aimed volleys from the Hessians and Militia force a morale test on the Jersey battalions and both retire.
A close run thing and more in the game but its 10pm and we have tested the rules pretty well. We decide that the Americans have snatched defeat from the jaws of Victory and declare a narrow British victory.
An interesting rule set that provided a fun and simple game, we will certainly try these again as well as giving Bloody Backs another outing or two as there seem to have been some updates to those rules recently too.
Thanks for reading, watch this space for the next test game.


 Throwing caution to the wind I advance my rifles onto the flank of the British gun, again they are pretty useless and the Grenadiers advance back into the fray and make short work of them with a devastating short range volley.
 I have now re-ordered both my Jersey battalions and advanced back into the fray. Steve on the left is loitering on the far edge of the woods pinning the British regulars without getting shot up whilst his artillery is peppering the rest of the British line.
 Chris decides now is the time to advance with his Hessians, the American guns however force him back with short range fire.

 Chris's Welsh Fusiliers take a pounding and need a morale test, he made me take this photo of the 3 sixes he threw to pass his morale. Pfft!
 The British line battalion behind the fence takes a good volley from Steves Continentals supported by the guns, a base goes and Chris is unable to stop them retreating, the Fusiliers meanwhile advance onto the centre of the American line and the reformed Hessians and Militia are pushed across to support the crumbling British right flank.
 The Fusiliers get forward but are stopped by concentrated American fire.
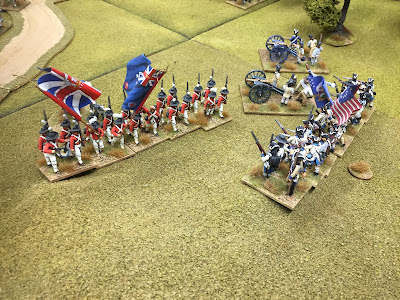 The Jersey boys have seen off the light battalion and the Grenadier battalion and line the flank of the British, they think its all over, but two well aimed volleys from the Hessians and Militia force a morale test on the Jersey battalions and both retire.
This seems to be a rule set Du Jour at the moment...have seen it mentioned quite a few times on various blogs recently! I like your description of the domino effect of failed morale tests, and it does sound quite realistic to me.
ReplyDeleteThank you, just played second one and its growing on me, wrte up in due course.
DeleteGreat looking game Roger, the rules sound good.
ReplyDeleteThey have potential Ray for sure.
DeleteI'm really enjoying this ruleset. As it's the (presumably) abridged version of the rules we're using, there are the odd part that doesn't appear complete/fully explained. Clearly my age but I can't remember what it was that was bugging me! I did look back over Loose Files & American Scrabble (from which these rules have evolved), but that didn't answer my quesion. Whatever that was?! It may have been moving and firing artillery...? There is a full set of the rules available in hardback... for over 30 quid! Maybe I should watch the Little Wars TV videos like Steve keeps saying. I prefer these to Bloodybacks. Great evening's entertainment
ReplyDeletePretty sure it was firing then moving artillery that was bugging me. I've watched the how to play video on Little Wars TV. As artillery can't volley fire, they are indeed free to fire and move. To be fair, artillery plays a rather minor role. It just seems odd to fire and move artillery in the same turn, but that is the intention of the rules. I'll live with it ;-)
DeleteAnd I can see the rules available for just under 30 quid. Ring bound, not hardcover. Sounds like the rules and scenario book together. Highly recommend picking up the $13 pdf if you're regularly gaming AWI in any scale
DeleteThat was a great looking game and quite a close run thing in the end. It's great to have play-tests of rules by people not associated with the rules. Your descriptions make it really easy to understand what it going on and to get a sense of the rules. Really helpful and interesting.
ReplyDeleteRegards, James
My pleasure glad you enjoyed it James
Delete